Crown molding is more than just a decorative trim—it’s a design detail that brings polish, depth, and sophistication to your kitchen cabinets. This elegant feature, often seen in upscale interiors, bridges the space between your cabinets and ceiling, softening harsh edges while adding visual height. Whether your kitchen style leans modern, traditional, or transitional, crown molding can serve as the perfect architectural flourish that transforms ordinary cabinetry into custom-built masterpieces. Hang Crown Molding On Kitchen Cabinets.
Why Add Crown Molding to Kitchen Cabinets?
The decision to install crown molding isn’t merely aesthetic—it’s a strategic enhancement that elevates both form and function. Not only does it increase the perceived value of your kitchen, but it also conceals gaps between the cabinet tops and ceiling. This detail creates a finished, cohesive look that feels intentional and timeless. For homeowners seeking a subtle yet effective upgrade, crown molding provides high impact with relatively low effort and cost.
Essential Tools and Materials You’ll Need
Before diving into installation, assembling the right toolkit is essential. Precision and clean execution hinge on having reliable equipment at your disposal. The fundamental tools include:
- A miter saw for accurate angle cuts
- Measuring tape and a level for precision
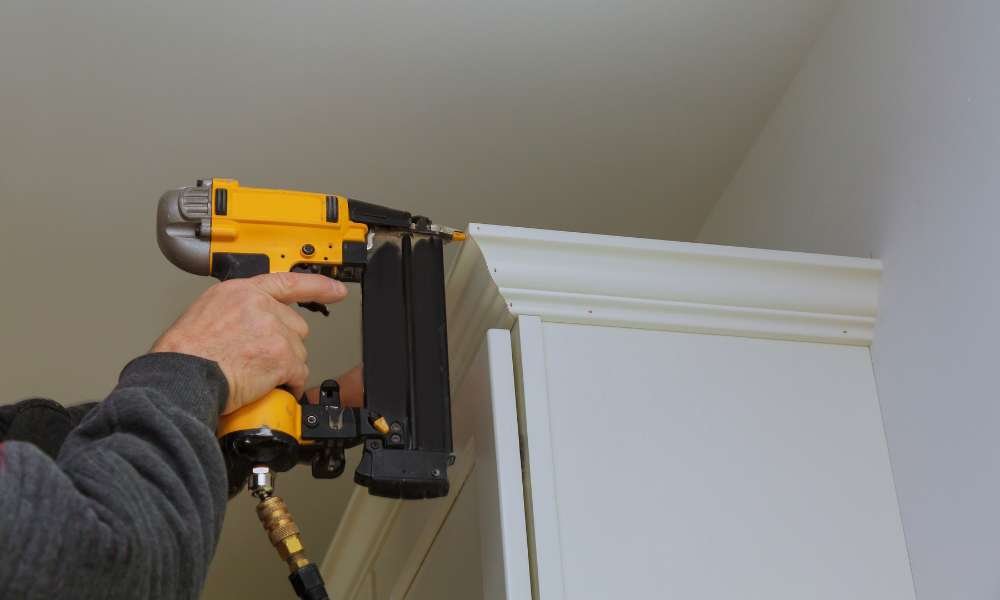
- Nail gun and finishing nails for secure attachment
- Wood glue or construction adhesive
- Painter’s caulk and caulking gun
- Sandpaper and putty knife
- Safety goggles and a dust mask
High-quality materials and tools ensure a smoother installation and a more professional finish.
Choosing the Right Crown Molding for Your Cabinets
Selecting crown molding should align with both your cabinet design and the overall kitchen ambiance. It’s not a one-size-fits-all decision—scale, shape, and style all play a critical role.
Types of Crown Molding Styles
There are numerous crown molding profiles to choose from, each offering a distinct character. Traditional ogee moldings are ornate and curvaceous, ideal for classic kitchens. Cove and stepped designs, with their simpler lines, suit modern or minimalist spaces. Dentil moldings, featuring repeating block patterns, add a touch of historical flair, while rope moldings offer a textured, handcrafted look. Matching your molding style to your cabinetry design results in visual harmony.
Material Options and Finishes
Wood remains the gold standard for crown molding, available in species like oak, maple, and pine. However, MDF (medium-density fiberboard) and polyurethane are popular, budget-friendly alternatives. MDF is smooth and easy to paint, while polyurethane is lightweight and resistant to moisture—great for kitchens prone to humidity. Finishes range from natural wood stains to glossy paint, and the choice should complement your existing cabinetry color scheme for a seamless effect.
Measuring and Planning: Getting the Perfect Fit
Precision is paramount. Start by measuring the length of each cabinet run where molding will be applied, allowing a few extra inches for each piece to accommodate angled cuts. Sketch a diagram and label every segment with its corresponding length and angle requirement. Dry-fitting and marking placement lines will reduce the risk of misalignment during installation. Remember, good planning eliminates guesswork and waste.
Prepping Your Cabinets and Molding for Installation
Before fastening anything, clean the tops of your cabinets to remove dust and grease that could interfere with adhesion. Lightly sand the back edge of the molding pieces for better glue grip. If your cabinets don’t reach the ceiling, consider using a wood filler strip (also known as a riser) to raise the molding to the correct height. Lay out all your cut pieces in the order they’ll be installed to streamline the process.
Step-by-Step Guide: How to Hang Crown Molding on Kitchen Cabinets
Marking and Cutting Angles
Use a miter saw to cut inside and outside corners at 45-degree angles. Always test-fit your angles on scrap pieces before making final cuts. Mark cabinet tops with pencil lines as a guide for precise placement. Label each molding piece on the back to avoid confusion during mounting.
Securing Molding with Nails and Adhesive
Apply a thin bead of wood glue or construction adhesive to the back of each piece. Position the molding carefully and secure it using a nail gun, placing nails at regular intervals. For cabinets without solid top panels, nailing into a filler strip or cleat is essential for stability.
Caulking and Finishing Touches
Once the molding is in place, fill any gaps or nail holes with caulk or wood filler. Smooth out excess with a damp cloth or putty knife. After drying, sand lightly for a seamless appearance. Prime and paint (or stain) your crown molding to match or complement your cabinets, and admire the transformation.
Common Mistakes to Avoid When Installing Crown Molding
Avoid rushing measurements or neglecting to test-cut angles. Incorrect miter cuts can leave unsightly gaps that are difficult to conceal. Over-nailing can split the molding, especially with thinner or delicate profiles. Skipping caulk or touch-up paint results in a disjointed, amateurish appearance. Attention to detail distinguishes a DIY attempt from a professional-grade finish.
Tips for Working Around Corners and Uneven Ceilings
Walls and ceilings are rarely perfectly square. Use a digital angle finder to measure non-standard angles accurately. When dealing with uneven ceilings, scribe the molding’s top edge for a tighter fit. Coping saws can help trim edges to fit inside corners precisely. Be patient—these small adaptations lead to a flawless final result.
Painting or Staining Your Crown Molding: What to Know
If you plan to paint, consider priming your molding before installation to save time. Use high-quality enamel paint for a durable, wipeable surface. For staining, apply wood conditioner first to ensure an even finish. Match or contrast the molding with your cabinets depending on the desired visual impact—subtle elegance or bold statement.
Maintenance and Cleaning After Installation
Crown molding requires minimal upkeep. Regular dusting with a microfiber cloth keeps it looking sharp. Avoid abrasive cleaners that can damage paint or stain. If cracks or shrinkage appear over time, reapply caulk and touch up paint to restore its original charm.
Budgeting for Your Crown Molding Project
Crown molding installation can range from $5 to $20 per linear foot, depending on material and complexity. DIY installations save on labor, but factor in the cost of tools if you don’t already own them. MDF and polyurethane offer cost-effective options, while solid hardwood is pricier but provides unmatched character and durability. Planning ahead keeps your project on budget and stress-free.
Final Thoughts
Learning how to hang crown molding on kitchen cabinets is an empowering project that offers lasting rewards. With careful planning, attention to detail, and a touch of creativity, this simple upgrade can dramatically elevate your kitchen’s design. It’s a perfect blend of function and flair—proof that even the smallest details can redefine a space.