Cooking skinny chook breasts in a pan is one of the quickest and maximum foolproof methods to create a delicious, protein-packed meal. With the right approach, you can attain a golden-brown crust on the outdoor even as preserving the internal soft and juicy. The key lies in even thickness, proper seasoning, and cooking over the right temperature. This method is right for beginners as it calls for no oven, no unique system, and minimum cleanup—only a pan, some warmth, and a chunk of interest. Cook Thin Chicken Breast In Pan.
Why Thin Chicken Breasts Are a Weeknight Dinner Hero
Thin bird breasts are a dream for busy weeknights. They prepare dinner in minutes, absorb flavor quick, and pair properly with nearly any facet dish—from salads and pastas to rice and roasted greens. Their rapid cooking time approach you can get dinner on the table in underneath 20 minutes, making them perfect for closing-minute food. Plus, they’re finances-pleasant and widely to be had in grocery shops. Whether you’re feeding a own family or meal-prepping for the week, thin chook breasts offer convenience with out sacrificing taste.
Benefits of Cooking Chicken Breast in a Pan
Pan-cooking hen breasts gives higher manage over temperature and texture. Unlike baking or grilling, cooking in a pan lets in you to alter the warmth instantly, sear the meat calmly, and even construct sauces without delay within the identical skillet. It’s additionally a superb technique for small batches, minimizing both time and electricity use. The direct contact with the hot pan allows increase a flavorful crust, enhancing the general flavor and mouthfeel of the hen. This approach is good when you want a short, flavorful, and gratifying meal.
Common Mistakes When Cooking Thin Chicken Breasts (And How to Avoid Them)
One of the most common pitfalls is overcooking, which results in dry, rubbery meat. Because thin chicken breasts cook so quickly, even a minute too long can ruin them. Another mistake is placing cold fowl directly into the pan, which leads to uneven cooking. Always let the meat sit at room temperature for a few minutes before cooking. Skipping the step of drying the surface with a paper towel can also prevent proper browning. Lastly, overcrowding the pan causes steaming instead of searing, so cook in batches if necessary.
Choosing the Right Pan for Cooking Chicken Breasts
The pan you use can significantly affect the outcome. A heavy-bottomed skillet, such as stainless steel or cast iron, is ideal because it retains and distributes heat evenly. Nonstick pans work well for ease, but they may not give you that golden-brown sear. Cast iron, on the other hand, excels in delivering a crisp, flavorful crust. Make sure your pan is large enough to fit the breasts without overcrowding, allowing proper searing and airflow around each piece.
Best Oils and Fats to Use for Pan-Cooking Chicken
When it comes to pan-cooking chicken, the type of oil matters. You need something with a high smoke point, like avocado oil, canola oil, or vegetable oil. These oils can handle the high heat required for a proper sear without burning. Butter can be added for flavor but should be combined with oil to prevent it from burning. Olive oil is popular for its taste but should be used cautiously at high heat to avoid smoking. Choose your fat based on the desired flavor and cooking temperature.
How to Properly Season Thin Chicken Breasts for Maximum Flavor
Seasoning is what takes fowl from bland to crave-worthy. At the very least, salt and pepper are essential—but don’t stop there. Garlic powder, onion powder, smoked paprika, Italian herbs, or even a dry rub can elevate your chicken’s flavor. For extra depth, try marinating the chicken for 15–30 minutes before cooking. Even a simple mixture of olive oil, lemon juice, and herbs works wonders. Remember to season both sides generously and press the seasoning into the meat for better adherence.
Preparing Your Chicken: Should You Pound, Slice, or Marinate?
Getting your chicken to an even thickness is crucial for even cooking. If your fowl breast is uneven or too thick, consider butterflying it or pounding it to about ½ inch thickness using a meat mallet. Slicing can also work—just make sure all pieces are the same size. Marinating adds flavor and can help tenderize the meat, especially if you’re using acidic ingredients like lemon juice or yogurt. However, avoid over-marinating, as too much acid can make the texture mushy. A quick 30-minute soak is usually enough to boost flavor without compromising quality.
Different Types of Thin Chicken Breasts
Not all thin chicken breasts are created the same, and knowing the types available can help you choose the best one for your needs. Thin fowl breasts generally fall into two categories: store-bought pre-sliced and home-prepared versions like butterflied or pounded breasts. Each has its advantages depending on your time, tools, and personal preference.
Store-Bought Pre-Sliced Thin Breasts
Store-bought thinly sliced bird breasts are distinctly convenient. They come pre-trimmed and frivolously sliced, making them ideal for immediate meals with out the need for added prep. These are particularly beneficial for novice chefs who won’t be snug the usage of a knife or meat mallet. However, some pre-packaged options can be inconsistent in thickness or contain brought answers for maintenance, so it’s vital to test the label and investigate each piece. Still, for ease and pace, those are a strong choice.
Butterflied and Pounded at Home
If you need greater control over texture and freshness, butterflying and pounding hen breasts at domestic is the manner to head. Start with a ordinary chicken breast and slice it horizontally to create two thinner portions, then pound them to a fair thickness the use of a meat mallet or rolling pin. This technique allows you to personalize thickness, ensure uniform cooking, and avoid the components regularly located in pre-sliced types. It does take a bit greater effort, but the result is frequently greater flavorful and tender.
Step-through-Step Guide: How to Cook Thin Chicken Breast in Pan
Step 1: Prep and Pat Dry
Before you even touch the range, begin by prepping your chook. Remove it from the packaging and pat it dry with paper towels. This step would possibly seem minor, however disposing of floor moisture guarantees the hen sears nicely in place of steaming in the pan. Moisture is the enemy of a very good crust, so make sure each piece is dry to touch earlier than it hits the heat.
Step 2: Season Generously
Seasoning is your best friend when it comes to chicken breast. Sprinkle both sides with salt, pepper, and your choice of spices—think garlic powder, smoked paprika, chili flakes, or Italian seasoning. If you’re going for simplicity, even salt and pepper alone can do wonders. Rub the seasoning in lightly to help it stick, and let the chicken sit for a few minutes while you heat the pan. This short rest allows the flavors to settle in and the meat to come closer to room temperature, which helps it cook evenly.
Step 3: Heat Your Pan Properly
Place your skillet over medium to medium-high heat and let it heat up fully before adding any oil. A properly heated pan is crucial for a good sear. You can test this by flicking a tiny drop of water into the pan—if it sizzles immediately and evaporates, you’re ready. Once the pan is hot, add a tablespoon of oil with a high smoke point, like canola or avocado oil. Tilt the pan to coat the bottom evenly.
Step 4: Add Chicken and Sear
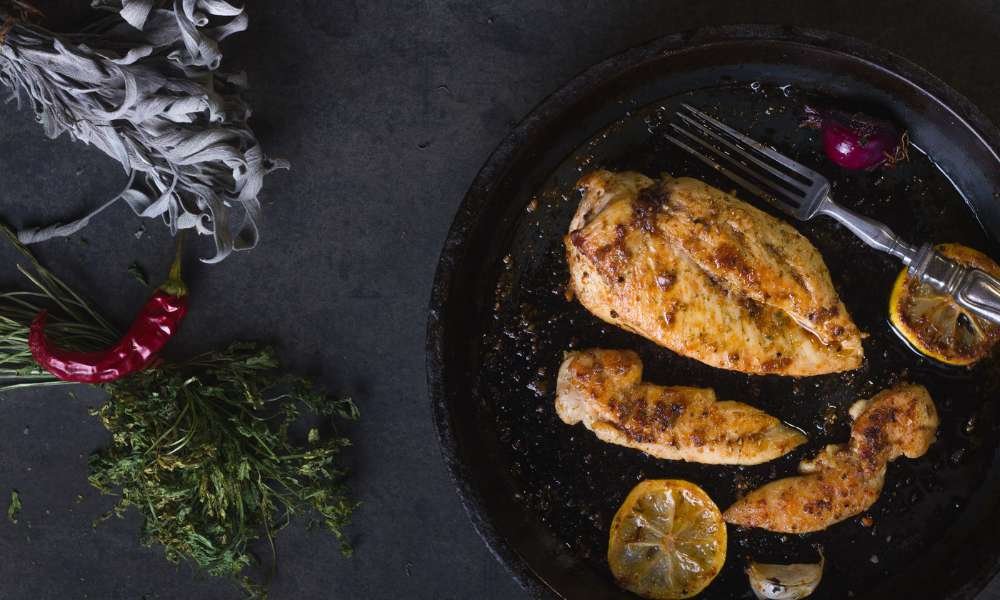
Carefully lay the chicken breast into the hot pan, laying it away from you to avoid oil splatter. Don’t overcrowd the pan; cook in batches if needed. Let the chicken cook undisturbed for 2 to 4 minutes, depending on thickness. You’re looking for a deep golden-brown color on the underside. Avoid pressing or moving the chicken too early, as this can interrupt the searing process.
Step 5: Flip and Finish Cooking
Once the bottom is perfectly golden, flip the chicken breast gently using tongs. Cook the second side for another 2 to 3 minutes. You’ll know it’s done when the internal temperature reaches 165°F or the juices run clear. The outside should be browned and crisp, while the inside remains juicy and tender.
Step 6: Rest Before Slicing
Once your chicken is cooked, transfer it to a clean plate and let it rest for 5 minutes. This resting time allows the juices to redistribute throughout the meat, ensuring every bite is moist. Slicing too early can cause those flavorful juices to run out, leaving the fowl dry. After resting, slice or serve the breasts whole, and enjoy your perfectly pan-cooked meal.
How Long Does It Take to Cook Thin Chicken Breast in a Pan?
Thin chicken breasts cook quickly, which is one of the main reasons they’re such a popular choice for busy weeknight dinners. On average, it takes about 3 to 4 minutes per side over medium to medium-high heat. The exact time depends on how thin your pieces are—chicken sliced to about ½ inch thick will cook through faster than slightly thicker cuts. The goal is to achieve a golden-brown crust on the outside while ensuring the inside is cooked through but still juicy. Always preheat the pan and avoid overcrowding to ensure even cooking.
How to Tell If Your Chicken Breast Is Done Without Overcooking
To avoid overcooking your thin chicken breast, look for visual and tactile cues. The surface should be golden and the meat should feel firm but springy when pressed. Clear juices are a good sign that it’s done—if they’re still pink or cloudy, it needs more time. For the most accurate check, use an instant-read meat thermometer: the internal temperature should reach 165°F (74°C). If you don’t have a thermometer, slice into the thickest part; the meat should be completely white with no pink in the center.
Simple Seasoning Ideas That Elevate Your Chicken
Thin chicken breasts are a blank canvas for flavor. While salt and pepper are staples, you can enhance the taste with a few pantry-friendly seasonings. For a Mediterranean flair, use garlic powder, oregano, and a squeeze of lemon. For a smoky profile, try paprika, cumin, and chili powder. A dash of soy sauce, ginger, and sesame oil brings an Asian twist. Don’t forget herbs like thyme, rosemary, or basil—they add freshness and depth. Mixing dry spices with a bit of olive oil also helps them stick better and adds moisture.
Delicious Pan Sauces to Pair with Chicken Breast
A simple pan sauce can instantly elevate your chicken dish. After cooking the chicken, deglaze the pan with a splash of broth, wine, or lemon juice to loosen the flavorful bits stuck to the bottom. Then, add a bit of butter and minced garlic for richness. For a creamy sauce, stir in a spoonful of cream or Greek yogurt. Dijon mustard and honey also make a fantastic sweet and tangy glaze. Keep it simple or get creative—either way, you’ll turn your fowl into a gourmet-style meal.
What to Serve with Thin Pan-Cooked Chicken Breasts
Thin chicken breasts pair beautifully with a wide range of sides. For a wholesome plate, try steamed veggies and brown rice or a light quinoa salad. Mashed potatoes or roasted sweet potatoes offer a comforting option. If you’re in the mood for freshness, a crisp green salad with vinaigrette balances the richness of the chicken. Pasta tossed with olive oil and herbs also makes a quick and satisfying companion. The beauty of pan-cooked chicken is that it goes with almost anything.
Storing and Reheating Leftover Thin Chicken Breast
Leftovers should be cooled completely and stored in an airtight container in the fridge for up to 3–4 days. To reheat, avoid using the microwave if possible, as it can make the chicken rubbery. Instead, warm it gently in a skillet with a splash of broth or water to prevent drying out. If you do use a microwave, cover the fowl with a damp paper towel to retain moisture and heat in short intervals. Leftover chicken is great in wraps, salads, sandwiches, or even shredded over pasta.
Pan-Cooking Thin Chicken for Meal Prep: Tips and Tricks
Thin fowl breasts are best for meal prep because they cook speedy, reheat properly, and may be utilized in a couple of dishes. To save time, cook dinner a batch at once and range the seasonings—some with herbs, others with spicy rubs or citrus. Store the cooked breasts in component-sized packing containers alongside grains and vegetables for balanced food. Slice or shred them to feature to bowls, wraps, or tacos for the duration of the week. Always label and date your boxes to maintain tune of freshness.
Final Thoughts
Cooking thin hen breast in a pan is a simple yet profitable approach that brings out the fine in this flexible reduce of meat. With only some ingredients and a touch interest, you could create a meal that’s juicy, flavorful, and pleasurable. Whether you’re cooking for one or prepping food for the week, gaining knowledge of this primary method opens the door to limitless tasty possibilities.