Remove Kitchen Cabinets might sound like a daunting job reserved for pros with power tools, but in reality, it’s a manageable DIY project—even for beginners. Whether you’re remodeling your entire kitchen or simply refreshing your space, learning how to remove kitchen cabinet can save you money and give you more control over the transformation. This guide will walk you through every stage, from understanding your cabinets to safely removing them, so you can approach the task with confidence and clarity.
Understanding Why You Might Want to Remove Your Kitchen Cabinets
There are many good reasons to take out your old kitchen cabinet. Perhaps you’re upgrading to a more modern design, fixing water or pest damage, or just rearranging your layout for better functionality. Removing cabinets can also make way for open shelving or larger appliances. In some cases, cabinet might be structurally sound but outdated in appearance—meaning you can repurpose them elsewhere after removal. Knowing your reasons can help you plan more efficiently and determine if you’re taking on a full demolition or a careful removal for reuse.
Essential Tools and Materials You’ll Need for Cabinet Removal
Before diving in, it’s important to have the right tools at hand. You’ll need basic hand tools like a screwdriver, pry bar, utility knife, and adjustable wrench. A power drill with a screwdriver bit can speed things up, especially if your cabinets are held in with multiple screws. Don’t forget safety essentials like work gloves, goggles, and a dust mask. You may also want drop cloths or old blankets to protect your countertops and floors. Having a sturdy ladder or step stool is key if you’re working on overhead cabinets.
Safety First: Precautions to Take Before You Start
Safety is crucial when removing anything attached to the walls. First, turn off electricity and water to avoid any accidents with outlets, wiring, or plumbing behind the cabinet. Make sure you have another person to help, especially when lifting heavy or overhead units. Keep the workspace clear of clutter and lay down coverings to prevent damage to flooring. Always wear protective gear and be mindful of nails, screws, or jagged wood pieces that could cause injury. A little caution goes a long way in keeping this project stress-free.
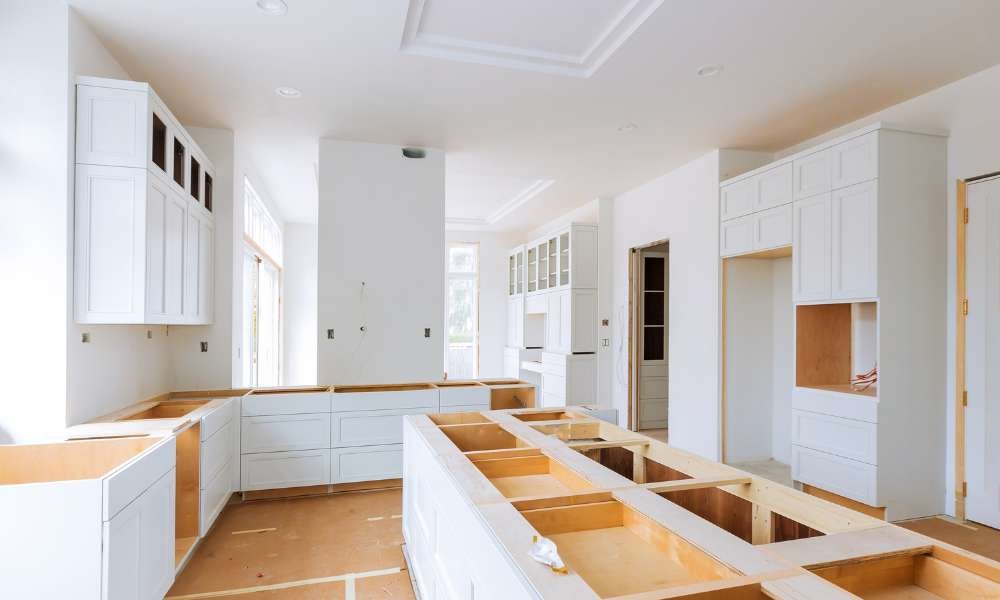
Types of Kitchen Cabinets and How They Affect Removal
Understanding what kind of cabinet you have makes removal much easier. Each type comes with its own quirks—some are easier to take out than others. Knowing this in advance can help you decide which tools to use and what level of effort to expect. Let’s break down the main types you’ll encounter:
Wall-Mounted Cabinets
These are the upper cabinets that are fixed to the wall studs. They’re often the first to be removed and can be tricky due to their height and weight. It’s important to support them from below while unscrewing the mounts to prevent them from crashing down. Be prepared for hidden screws or nails that may require some patience to locate and remove.
Base Cabinets
Located beneath the countertop, base cabinets are usually more stable but can be harder to move due to their attachment to countertops and plumbing. You’ll often need to detach sinks, countertops, or even disconnect pipes. Once that’s done, unscrewing them from the wall and floor is usually straightforward.
Custom-Built Cabinets
These are often crafted to fit a unique kitchen layout and may not be as simple to remove. Custom cabinets are usually more securely fastened and could be glued, nailed, or screwed into place in less visible areas. You’ll need to proceed carefully to avoid damaging the walls, especially if you plan to preserve the structure underneath.
Modular or Prefabricated Cabinets
Modular cabinets are factory-made and typically easier to dismantle. Since they are standardized in size and construction, their attachment points are often more accessible. These cabinets are ideal for beginners, as you can usually take them apart with just a screwdriver and a little patience.
Preparing Your Kitchen for Cabinet Removal
Before grabbing a screwdriver, take time to prepare your kitchen properly. This step is essential to keep things organized and prevent unnecessary damage. Start by removing anything that might be in the way—dining furniture, small appliances, or décor. Cover any light fixtures or exposed outlets, and set up a designated space for tools and removed materials. If you’re keeping the cabinet for reuse or donation, have blankets or cardboard on hand to protect them once they’re out. Good preparation will save you from headaches mid-project and make the process more efficient.
How to Protect Your Countertops, Floors, and Appliances
Removing cabinets can get messy, so take proactive steps to protect nearby surfaces. Use drop cloths or old bedsheets to cover countertops and appliances. For flooring, especially tile or hardwood, lay down cardboard or a thick blanket to shield against falling screws or debris. Tape off the edges of your countertops and adjacent walls with painter’s tape to prevent accidental scrapes. If you’re working near a refrigerator or stove, unplug and move them slightly away from the cabinet to create a safer working space.
Step-by-Step Process: How to Remove Kitchen Cabinets Safely and Easily
Removing cabinets might seem like a demolition job, but it actually follows a clear and manageable sequence. Follow these steps carefully, and you’ll avoid damage and stress.
Turn Off Power and Water Supply
Begin by switching off the electricity from the circuit breaker—especially important if your cabinets are near outlets or light fixtures. If there’s a sink or dishwasher attached to the cabinetry, shut off the water valves and disconnect the plumbing. Skipping this step can lead to electrical shocks or messy leaks.
Empty Cabinets and Clear the Workspace
Take everything out of the cabinet, from dishes and dry goods to shelf liners and organizers. Use this opportunity to declutter! Clearing the workspace will make it easier to move around and reduce the chance of accidents. Keep tools within reach, but out of the walkways.
Detach Cabinet Doors and Hardware
Next, remove the doors, hinges, and any handles or knobs. This reduces weight and minimizes the chance of doors swinging and causing injury or breakage. Label parts if you plan to reinstall them or use them for another project. Store hardware in labeled bags to keep screws and brackets organized.
Remove Trim, Caulk, and Sealant
Carefully score any caulk or sealant around the cabinet edges with a utility knife. If there’s trim molding or decorative edges, gently pry them off using a putty knife or crowbar. Go slowly to avoid damaging the wall behind them, especially if you’re aiming for a clean finish for repainting or patching.
Unscrew and Dismount Cabinets from Wall Studs
Most cabinets are anchored to wall studs with screws. Locate the screws—typically inside the back panels of the cabinet—and unscrew them while supporting the cabinet from underneath. Having a second person hold the cabinet while you unscrew is highly recommended. Wall-mounted units can be heavy and unstable once loosened.
Clean Up and Patch the Wall
Once the cabinets are out, inspect the wall for holes, leftover adhesive, or minor damage. Use a putty knife and spackle to fill in holes or dents, then sand the area smooth once dry. Wipe everything down to remove dust and prepare the space for its next transformation—whether it’s new cabinets, open shelving, or a fresh coat of paint.
Common Mistakes to Avoid During Cabinet Removal
Removing kitchen cabinets might seem straightforward, but rushing through the process can lead to unnecessary damage or even injury. One common mistake is failing to turn off the power and water supply before starting—this can result in electrical shocks or water leaks if outlets or plumbing are involved. Another frequent oversight is not labeling or organizing the hardware and cabinet pieces, which becomes a problem if you plan to reuse or reassemble them later. Many beginners also use the wrong tools, such as trying to pry the cabinet with a hammer instead of a proper pry bar, leading to wall damage. Lastly, skipping the step of protecting surrounding surfaces like countertops and floors can cause scratches or dents that add to your renovation costs. Taking a careful, step-by-step approach avoids these pitfalls and ensures the project stays on track.
What to Do with Old Kitchen Cabinets After Removal
Once your cabinets are removed, don’t be too quick to toss them out. Depending on their condition, there are several eco-friendly and budget-conscious options to consider. If the cabinets are still in good shape, you can donate them to local charities, schools, or reuse centers like Habitat for Humanity. Selling them online through platforms like Facebook Marketplace or Craigslist is another popular option. For a more creative route, consider repurposing them into garage storage units, a laundry room organization system, or even a garden workbench. If they’re beyond saving, disassemble them and recycle the wood or metal components where possible. Repurposing or responsibly disposing of old cabinet is not just smart—it’s sustainable and often surprisingly rewarding.
Tips for a Smooth Transition to Your Next Kitchen Upgrade
After removing your old cabinet, it’s the perfect time to reimagine your kitchen layout and functionality. Start by thoroughly inspecting your walls, floors, and plumbing to ensure everything is in good shape before installing new units. If you’re planning a remodel, take this moment to update electrical outlets or lighting since the walls are more accessible. Create a detailed plan for your new cabinetry or layout, factoring in both aesthetics and workflow—like placing frequently used items within easy reach. Use temporary shelves or storage bins to keep your kitchen usable during the transition period. Most importantly, don’t rush the process. Taking time now to plan properly will lead to a kitchen that not only looks great but functions better for years to come.